


Votos - 4, Puntuación media: 4
(

 )
)
|
Fotos y especificaciones Panasonic ES-SL41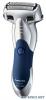 |


Resumen del manual
• Do not wash the AC adaptor with water. English > Storing the shaver • When storing the shaver, always put it in the carrying holder to avoid scratching the outer foil. Parts identification .. • Store the shaver in a place with low humidity after use. . . • Do not store the shaver where it will be exposed to direct sunlight or other heat sources. . . • Remove the shaver from the AC adaptor when storing it. • Do not bend the power cord or wrap it around the AC adaptor. . . . . . . . . . . . . . A Main body 1 System outer foil 2 Cleaning shutter 3 Side terminals 4 Power switch 5 Foil frame release button 6 Water inlet 7 Foil frame 8 System outer foil release buttons 9 Inner blades : Outer foil section ; Trimmer < Trimmer handle B AC adaptor (RE7.73) = Charging terminal > Charge indicator lamp . Power cord C Carrying holder D Cleaning brush English Using the carrying holder The shaver can be kept vertically or horizontally. When transporting the shaver, you can use the carrying holder to protect the outer foil and prevent erroneous operation of the switch. •When transporting the shaver, be sure to clean off any shavings before attaching the carrying holder. Attaching the carrying holder Attach the carrying holder as illustrated. •Check that all four protrusions on the shaver are inserted securely. Removing the carrying holder Remove the carrying holder while pressing down on both sides. Charge Charging the shaver Perform the following steps to charge the shaver if it seems to lose the speed. You can charge the shaver with the carrying holder attached. 11Turn off the shaver and insert it in the AC adaptor until it clicks as illustrated. •Wipe off any water droplets on the side terminals. •If you charge the shaver with power switch turned on, it will start working when you remove from the AC adaptor. 2122Put the plug into a household outlet. The charge indicator lamp glows red. •Charging is completed after approx. 8 hours. •When charging the shaver for the first time or when it has not been in use for more than 6 months, the charge indicator lamp may not glow for a few minutes, or the operating time may shorten. Please charge it for more than 20 hours in such cases. English Using the carrying holder The shaver can be kept vertically or horizontally. When transporting the shaver, you can use the carrying holder to protect the outer foil and prevent erroneous operation of the switch. •When transporting the shaver, be sure to clean off any shavings before attaching the carrying holder. Attaching the carrying holder Attach the carrying holder as illustrated. •Check that all four protrusions on the shaver are inserted securely. Removing the carrying holder Remove the carrying holder while pressing down on both sides. Charge Charging the shaver Perform the following steps to charge the shaver if it seems to lose the speed. You can charge the shaver with the carrying holder attached. 11Turn off the shaver and insert it in the AC adaptor until it clicks as illustrated. •Wipe off any water droplets on the side terminals. •If you charge the shaver with power switch turned on, it will start working when you remove from the AC adaptor. 2122Put the plug into a household outlet. The charge indicator lamp glows red. •Charging is completed after approx. 8 hours. •When charging the shaver for the first time or when it has not been in use for more than 6 months, the charge indicator lamp may not glow for a few minutes, or the operating time may shorten. Please charge it for more than 20 hours in such cases. 3 33 Disconnect the plug after charging is completed. • Charging the battery for more than 8 hours will not affect battery performance. • Recommended ambient temperature for charging is 0 .35 °C. The battery may not charge properly or at all under extreme low or high temperatures. • The charge indicator lamp glows and stays on until the plug is disconnected from a household outlet. 4 • A full charge will supply enough power for approx. 7 shaves of 3 minutes each. (This will differ depending on usage.) You cannot operate the shaver while charging. Shave Using the shaver Press the power Hold the shaver as 1 112 22 switch. illustrated above and shave. Start shaving by applying gentle pressure to your face. Stretch your skin with your free hand and move the shaver back and forth in the direction of your beard.You may gently increase the amount of pressure as your skin becomes accustomed to this shaver. Applying excessive pressure does not provide a closer shave. You can also use a pen grip to hold the shaver. Caution • Before shaving, check that the cleaning shutter is closed. • Do not place your fingers on the power switch while using the shaver. This may cause the shaver to turn off. • Do not use shaving creams or face cleansers containing scrubbing compounds as these may cause the outer foil to clog. Using the trimmer Slide the trimmer handle up. Place at a right angle to your skin and move downwards to trim your sideburns. En...