


Votos - 4, Puntuación media: 4.3
(

 )
)
|
Fotos y especificaciones Sony DHC-MD373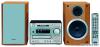 |


Resumen del manual
The CLASS 1 LASER PRODUCT MARKING is located on the rear exterior. The following caution label is located inside of the unit. Table of Contents Getting Started Step 1: Hooking up the system ................ 4 Step 2: Setting the time ............................ 6 Step 3: Presetting radio stations ............... 7 Saving the power in standby mode ........... 9 Basic Operations Playing a CD ........................................... 10 Recording a CD on an MD — CD-MD Synchro Recording ........ 11 Playing an MD ........................................ 12 Listening to the radio — Preset Tuning ............................... 13 Recording from the radio — Manual Recording ....................... 14 The CD Player Playing CD tracks repeatedly — Repeat Play .................................. 16 Playing CD tracks in random order — Shuffle Play ................................. 16 Programming CD tracks — Programme Play .......................... 17 Using the CD display .............................. 18 Labelling a CD — Disc Memo ............... 19 The MD Deck — Play Playing MD tracks repeatedly — Repeat Play .................................. 21 Playing MD tracks in random order — Shuffle Play ................................. 22 Programming MD tracks — Programme Play .......................... 22 Using the MD display ............................. 24 The MD Deck — Recording Before you start recording ....................... 25 Recording your favourite CD tracks on an MD — CD-MD Synchro Recording ........ 26 Recording on an MD manually — Manual Recording ....................... 27 Starting recording with 6 seconds of prestored audio data — Time Machine Recording ............ 28 Marking track numbers ........................... 30 Making a space between tracks 3 seconds long — Smart Space ........ 31 Adjusting the recording level .................. 33 Monaural recording ................................. 34 The MD Deck — Editing Before you start editing ........................... 35 Labelling an MD — Name Function ...... 36 Erasing recordings — Erase Function .... 37 Moving recorded tracks — Move Function ............................ 40 Dividing recorded tracks — Divide Function ........................... 41 Combining recorded tracks — Combine Function ....................... 42 Undoing the last edit — Undo Function ............................. 44 Sound Adjustment Reinforcing the bass sound — DBFB ..... 45 Selecting the Preset Equalizer menu ....... 45 Other Features Labelling the preset stations — Station Name ............................... 46 Using the Radio Data System (RDS) (European model only) ..................... 47 Falling asleep to music — Sleep Timer ................................. 48 Waking up to music — Daily Timer ................................. 48 Timer recording radio programmes ........ 50 Connecting optional components Connecting optional A/V components .... 52 Connecting external aerials ..................... 53 Additional Information Precautions .............................................. 54 System limitations of MDs ..................... 55 Troubleshooting ...................................... 56 Self-diagnosis Display ............................ 58 Specifications .......................................... 60 Parts descriptions for the remote ............. 61 Index ........................................................ 63 Getting Started Getting Started Step 1: Hooking up the system Perform the following procedure 1 to 4 to hook up your system using the supplied cords and accessories. AM loop aerial Right speaker DHC-MD373 rear panel FM aerial Left speaker 1 Connect the speakers. 2 Connect the FM/AM aerials. Connect the speaker cords to the SPEAKER Set up the AM loop aerial, then connect it. terminals on the unit and to the terminals on the speakers as below. Keep the speaker cords away from the aerials to prevent noise. +R+L –– Insert this portion AM 75 COAXIAL AM loop aerial Extend the FM wire aerial horizontally Black (#) Grey (3) 3 Set the VOLTAGE SELECTOR on the bottom of the system to the position of your local power line voltage (for models with a voltage selector). 220V 110V 240V 120V VOLTAGE SELECTOR 4 Connect the mains lead to a wall outlet. If the plug of the mains lead does not fit your wall outlet, attach the supplied adaptor on to the plug (for models with a plug adaptor). Inserting two R6 (size AA) batteries into the remote Getting Startede E e E Tip With normal use, the batteries should last for about six months. When the remote no longer operates the system, replace both batteries with new ones. Notes • If you do not use the remote for a long period of time, remove the batteries to avoid possible damage from battery leakage. • Be sure to insert the batteries in correct direction. • Do not mix new batteries with old ones. • Do not use different types of batteries together. • Do not use a battery that is leaking. • If the battery leaks, clean the battery compartment ...