


Votos - 3, Puntuación media: 4.3
(

 )
)
|
Fotos y especificaciones Sony MHC-RG55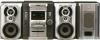 |


Otros manuales para este modelo:
Resumen del manual
1 Prepare the source you want to mix. Then, load a recordable tape in deck B. 2 Press the function button of the source you want to record (e.g., CD). When you want to record from TAPE A, press TAPE A/B repeatedly until TAPE A is selected. 3 Press REC PAUSE/START. Deck B stands by for recording. “REC” flashes. 4 Press DIRECTION repeatedly to select g to record on one side. Select j (or RELAY) to record on both sides. 5 Press REC PAUSE/START, and then start singing, speaking or playing the desired source. Recording starts. To stop recording Press x. Tips • If acoustic feedback (howling) occurs, move the microphone away from the speakers or change the direction of the microphone. • If you want to record your voice through the microphone only, you can do so by selecting the CD function and not playing a CD. • When high level sound signals are input, the system automatically adjusts the recording level to prevent distortion of the recorded sound signal (Auto Level Control function). 26GB Falling asleep to music Waking up to music Falling asleep to music Waking up to music —Sleep Timer You can set the system to turn off after a certain time, so that you can fall asleep to music. Press SLEEP on the remote. Each time you press the button, the minute display (the turn-off time) changes cyclically as follows: AUTO* t 90 MIN t 80 MIN t 70 MIN t … t 10 MIN t OFF * The system turns off when the current CD or tape finishes playback (for up to 100 minutes). Other Operations To Press Check the SLEEP on the remote once. remaining time** Change the time to SLEEP on the remote turn off repeatedly to select the time you want. Cancel the Sleep SLEEP on the remote Timer function repeatedly until “SLEEP OFF” appears. ** You cannot check the remaining time when you select “AUTO”. —Daily Timer You can wake up to music at a preset time. Make sure you have set the clock (see “Setting the clock” on page 11). 1 Prepare the music source you want to play. • CD: Load a CD. To start from a specific track, make a program (see “Programing CD tracks” on page 13). • Tape: Load a tape with the side you want to play facing forward. • Radio: Tune in the preset station you want (see “Listening to the radio” on page 16). 2 Adjust the volume. 3 Press CLOCK/TIMER SET on the remote. “DAILY 1 SET” appears. 4 Press v or V repeatedly to select “DAILY 1 (or 2) SET”, then press ENTER. “ON” appears and the hour indication flashes. continued Other Features 27GB Waking up to music (continued) 5 Set the time to start playing. Press v or V repeatedly to set the hour, then press B. The minute indication flashes. Press v or V repeatedly to set the minute, then press ENTER. 6 Repeat step 5 to set the time to stop playback. 7 Press v or V repeatedly until the music source you want appears. The indication changes as follows: t TUNER y CD PLAY T t TAPE PLAY T 8 Press ENTER. The type of timer (DAILY 1 or DAILY 2), followed by the start time, stop time, and the music source appear, then the original display appears. 9 Press ?/1 to turn off the system. Other Operations To Do this Check the setting Press CLOCK/TIMER SELECT on the remote and press v or V repeatedly to select the respective mode (DAILY 1 or DAILY 2), then press ENTER. Change the setting Start over from step 1. Cancel the timer Press CLOCK/TIMER SELECT on the remote and press v or V repeatedly to select “TIMER OFF”, then press ENTER. Tip The system turns on 15 seconds before the preset time. Notes • You cannot activate DAILY 1 and DAILY 2 Timer at the same time. • When you use the Sleep Timer, the Daily Timer will not turn on the system until the Sleep Timer turns it off. • You cannot activate Daily Timer and Timer- recording at the same time. • If the system is on at the preset time, you cannot activate the Daily Timer. 28GB Optional Components Hooking up optional components To enhance your system, you can connect optional components. Refer to the operating instructions provided with each component. Optional Components Video game machine From the audio and video output of the video game machine TV To the video input of a TV To the digital input jack of the MD deck MD deck From the audio output of the MD deck or VCR MD deck or VCR A VIDEO INPUT jack Use a video cable (not supplied) to connect the video output of the optional video game machine to this jack. B AUDIO INPUT jacks Use audio cords (not supplied) to connect the audio output of the optional video game machine to these jacks. You can then output audio through this system. Note To enjoy video game sound, see “Enhancing video game sound” on page 25, or see “Selecting the sound effect” on page 22 for video game sound effects. C CD DIGITAL OUT jack Use a digital optical cable (square, not supplied) to connect the audio input of the optional MD deck to this jack. You can then record digital audio from this system. D MD (VIDEO) IN jacks Use audio cords (not supplied) to connect the audio output of the optional component (such as MD deck or VCR) to these...
Otros modelos de este manual:estéreo - MHC-RG55S (276.38 kb)
estéreo - MHC-RG66 (276.38 kb)