


Votos - 3, Puntuación media: 3.7
(

 )
)
|
Fotos y especificaciones Samsung SP-H500AE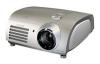 |


Otros manuales para este modelo:
Resumen del manual
Minimized fan noise and light leakage The airflow and fan installation structure are optimized to minimize fan noise and beam leakage. Various Input Ports ¦ Five types of input ports including a DVI-D (compatible with HDCP) port, two Component ports improve connection to external peripherals. User adjustments ¦ This unit allows adjustment of each input port. ¦ The unit has a reference pattern that can be used for positioning and adjustment. ¦ The remote control is backlit to improve usability in a dark environment. Caution on Lamp Use and Replacement Projector Lamp ¦ The Projector lamp changes in nature depending on time of use and using environment. Refer to the installation and other recommended operational sections of the user’s manual to avoid rapid degradation of performance and deterioration of picture quality. The projector lamp requires regular replacement. ¦ Free servicing will be offered within 90 days after purchasing of the product and within 300 hours of product use, if the problem is due to a defective lamp. ¦ You can check the lamp use time by pressing the INFO button on the remote control. Caution on Lamp Replacement ¦ Unplug the power cord before replacing the lamp. ¦ Inside of the projector is very hot. Cool off the projector for at least an hour after turning off. ¦ Contact your dealer to purchase a lamp for replacement. (Ultra violets from the lamp can damage your eyes.) ¦ Turn off the power of the lamp before replacement or repair. (Due to the high-pressure of the lamp, it is possible to explode.) ¦ When the lamp is broken, be careful not to be hurt by glass pieces. Refer to the manual for proper handling. Caution on Lamp Use ¦ This projector produces intense light. Do not stare light source directly. ¦ Do not touch the exhaust vent during operation. It can be very hot. ¦ Do not expose the unit to rain or moisture. Preparation Caution V I S U A L R E A L I S M Preparation Projector and Accessories ............................8 Installation and Basic Adjustments ..........14 PROJECTOR AND ACCESSORIES Front/Upper Side and Accessories Preparation Projector and Accessories Front/Upper Side 11 Indicators -TEMP (Red LED) -LAMP (Blue LED) -STAND BY (Blue LED) Refer to page 9 for details. 22 Remote Control Signal Receiver 33 Focus Ring Used for Focus Adjustment. 44 Lens 55 Adjustable Feet You can adjust the screen position by moving up and down the adjustable feet. 66 Zoom Knob Used to enlarge or reduce image size. 77 MENU Used to open the on-screen Menu. 88 POWER Used to turn the projector on or off. 99 SOURCE Used to select input signals from the external sources. 1100 Select and Move Button Used to select an menu item, and to move the cursor. 1111 LENS SHIFT Dial You can adjust screen images up and down within the lens range. 1 2 3 4 5 6 789 10 11 Accessories Remote Control/ Power Cable Owner's Instructions 2 Batteries Indicator Information Indicator Information : Turned On : Flashing : Turned Off TEMP LAMP STANDBY Information If you press the POWER button on the remote control or projector, the screen appears within 30 seconds. The projector is in normal operating condition. The projector is warming up after POWER button has been pressed. The POWER button is pressed to turn off the projector, and the cooling system is in operation to cool off inside of the projector. (Lasts for about 1 minute and 30 seconds) Refer to measure 1 below if the cooling fan inside the projector is not in normal operation condition. Refer to measure 2 below if the lamp cover protecting the lamp unit is not closed properly. Power is turned off automatically when temperature inside of the projector goes beyond the control limit. Refer to measure 3. Refer to measure 4 below if the life span of the lamp is running out or a problem with the lamp is detected. Clearing Indicator Problems Classification State Measures Measure 1 When the cooling fan system is not in normal operating condition. Unplug and plug the cord and restart the projector. If the problem does not disappear, contact a dealer or service personnel near you. Measure 2 When the lamp cover protecting the lamp unit is not properly closed or the sensor system is not in normal operating condition. Check the screw on the bottom side of the projector. If you do not find any problem, contact a dealer or service personnel near you. Measure 3 When temperature inside of the projector becomes too high. Adjust the position of the projector following the installation instructions of this manual and cool off the projector before restarting it. If the problem does not disappear, contact a dealer or service personnel near you. Measure 4 The lamp is malfunctioning after abnormal power off or restarting right after turning off the projector. Power off the projector and cool it off for some time before restarting it. When brightness of the picture screen degrades or image deterioration is found. Check how long the lamp has been used on Information and contact a dealer or se...
Otros modelos de este manual:Proyectores - SP-H700AE (4.28 mb)
Proyectores - SP-H710AE (4.28 mb)