


Votos - 1, Puntuación media: 5
(
 )
)
)
|
Fotos y especificaciones Vision Fitness E4000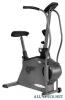 |


Resumen del manual
Box 280 ♦ Lake Mills. Wl 53551 toll free 800.335.4348 ♦ phone 920.648.4090 ♦ fox 920.648.3373 ©2006 Vision Fitness. All Rights Reserved. 9.06 AG18.07PRD REV3 TOOLS & PARTS INCLUDED ff y 4mm L-Shaped Wrench Front Axle, Qty: 1 Front Transport Wheels, Qty: 2 Arm Rail Covers, Qty: 2 Water Bottle & Bracket, Qty: 1 Owners Guide, Qty: 1 Assembly Guide, Qty: 1 Warranty Card, Qty: 1 Closed Wrench HARDWARE INCLUDED il ORANGE BAG » if PINK BAG § M8 x40L Bolt Quantity: 2 M8 x 30 Washer Quantity: 2 Assembly Guide E4000 DUAL-ACTION UPRIGHT FITNESS BIKES To avoid possible damage to this Fitness Bike, please follow these assembly steps in the correct order. Before proceeding, find your new Fitness Bike's serial number located on the front axle tube, and enter Refer to this number when calling for service, and enter this serial number on your Warranty Card and in your own records. Be sure to read your Owners Guide before using your new Fitness Bike. If any parts, hardware or tools are missing, please call 1.800.335.4348, Extension 12 NOTE: It is recommended that you apply grease to the threads of each screw as you assemble your Fitness Bike to prevent loosening and noise. Also, during each assembly step, ensure that ALL screws and nuts are in place and partially threaded in before completely tightening any ONE screw. sue] il ORANGE BAG I * Slide the rear foot in place and secure with four bolts (M8x20L). Tiqhten with the 5mm T-shaped wrench. V * Loosen the setscrew in the arm axle with the 4mm L-shaped Wrench. * Slide the front arm axle into the plastic sleeve of the front foot. Slide a wavy washer onto each end of the axle. * You will now need to disassemble part of the roller assembly on the arm crank. Please remove the nylock nut (M8), the washer (M8xl7), the tension spring, the washer (M13), and the outside roller. Repeat this step on the left side. * Slide the right dual-action arm onto Itis right arm axle and the right inside roller. Reinstall the outside roller, the washer (Ml 3), the tension spring, the washer (M8xl7), and the nylock nut (Ml 3). Repeat this step on the left side * Attach the right arm cover to the right arm. It should snap into place. Repeat this step on the left side. * Install the right transport wheel, the washer (M8x30), and the nylock nut (M8) to each end of the axle. Tighten with the dosed wrench. Repeat this step on the left side. * Tighten the set screw in the arm axle V__y C2Z) PINK BAG • Remove the three screws from the upper cover of the bike frame. • Slide the upper cover onto the console mast. • Attach the included wire tie to the sensor wire and pull the sensor wire up through the console mast. Slide the tension control cable up through the console mast. • Slide the console mast onto the frame bracket and fix it in place with two bolts (M8x40L) and the 5mm T-shaped wrench. • Install the batteries into the console. Plug hi, sensor wire into the console. Attach the console with the induded screws. • Turn the tension knob to Level 1 5. Connect the tension control cable from the knob to the cable inside the mast. Turn the knob to Level 1 and mount the knob to the mast with the screw (M5 x 12L). • Slide the upper cover into place and secure it to the frame using the two screws for the front and one screw for the back of the cover (these are the screws you removed earlier in step 3). • Attach the water bo tile cage to the upper cover with included screws. * Place the seat on the seat post and tighten the nuts on the underside of the seat with the dosed wrench. Tension Control Knob Water Bottle Cage * Attach the left and right pedals to the left and right crank arms. Tighten using the 15mm Pedal wrench. * Slide the foam grips onto the dualaction arms. NOTt: If they are difficult to slide on, try to spray a lubricant such as Armor-All onto the arm to help with this step. i...