


Votos - 2, Puntuación media: 4.5
(

 )
)
|
Fotos y especificaciones Sony KDL-37V4000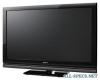 |


Otros manuales para este modelo:
TV - KDL-37V4000 (869.23 kb)
TV - KDL-37V4000 (33.56 mb)
TV - KDL-37V4000 (27.8 mb)
TV - KDL-37V4000 (22.31 mb)
Resumen del manual
Picture Mode (except PC input mode) See page 20. Display Mode (in PC input mode only) See page 20. Sound Effect See page 21. Speaker See page 21. PIP (in PC input mode only) See page 18. H Centre (in PC input mode only) See page 22. V Lines (in PC input mode only) See page 22. Sleep Timer (except PC input mode) See page 23. Power Saving See page 22. To view two pictures simultaneously – PIP (Picture in Picture) You can view two pictures (PC input and TV programme) on the screen simultaneously. Connect a PC (page 16), and make sure that images from a PC appear on the screen. ~ You cannot display resolutions higher than WXGA (1280 . 768 pixels). 1 Press TOOLS to display the Tools menu. 2 Press F/f to select “PIP”, then press . The picture from the connected PC is displayed with full size and the TV programme is displayed on the right corner. You can use F/f/G/g to move the TV programme screen position. 3 Press number buttons or PROG +/-to select the TV channel. To return to single picture mode Press RETURN. z You can switch the audible picture by selecting “PC Sound/TV Sound” from the Tools menu. Using “Control for HDMI” The “Control for HDMI” function allows equipment to control each other using HDMI CEC (Consumer Electronics Control) specified by HDMI. You can perform interlocked control operations between Sony “Control for HDMI” compatible equipment such as a TV, DVD recorder with hard disk and audio system by connecting the equipment with HDMI cables. Be sure to correctly connect and set the compatible equipment to use the “Control for HDMI” function. To connect the “Control for HDMI” compatible equipment Connect the compatible equipment and the TV with an HDMI cable. When connecting an audio system, in addition to the HDMI cable, be sure to also connect the audio output socket of the TV and the audio system. For details, see page 16. To make the “Control for HDMI” settings “Control for HDMI” must be set on both the TV side and the connected equipment side. See HDMI Set-up (page 24) for the TV side settings. See the operating instructions of the connected equipment for setting details. “Control for HDMI” functions • Turns the connected equipment off interlocked with the TV. • Turns the TV on interlocked with the connected equipment and automatically switches the input to the equipment when the equipment starts to play. • If you turn on a connected audio system while the TV is on, the input switches to the audio from the audio system. • Adjusts the volume and mutes the sound of a connected audio system. 18 GB Using MENU FunctionsUsing MENU Functions 5 External Inputs Selects equipment connected to your TV. • To watch the desired external input, select the input source, then press . 6 Settings Navigating through Displays the Settings menu where most of the advanced settings and adjustments are menus performed. 1 Press F/f to select a menu icon, then “MENU” allows you to enjoy various convenient press . features of this TV. You can easily select channels 2 Press F/f/G/g to select an option or or inputs sources and change the settings for your adjust a setting, then press . TV. For details about settings, see page 20 to 27. ~ The options you can adjust vary depending on the situation. Unavailable options are greyed out or not displayed. * This function may not be available in some countries/regions. 2 1 1 Press MENU. 2 Press F/f to select an option, then press . To exit the menu, press MENU. Select: Enter: Exit: MENU Digital Favourites 1 Digital Favourites* Displays the Favourite list. For details about settings, see page 15. 2 Analogue Returns to the last viewed analogue channel. 3 Digital* Returns to the last viewed digital channel. 4 Digital EPG* Displays the Digital Electronic Programme Guide (EPG). For details about settings, see page 14. Using 19 GB Picture Adjustment menu Picture Mode Display Mode (only in PC mode) Selects the picture mode except for PC input source. “Vivid”: (“Shop”, see page 6). For enhanced picture contrast and sharpness. “Standard”: (“Home”, see page 6). For standard picture. Recommended for home entertainment. “Cinema”: For viewing film-based content. Most suitable for viewing in a the- atre-like environment. This picture setting was developed in collaboration with Sony Pictures Entertainment to faithfully reproduce movies as intended by their creators. Selects the display mode for PC input source. “Video”: For video images. “Text”: For text, charts or tables. Backlight Adjusts the brightness of the backlight. Contrast Increases or decreases picture contrast. Brightness Brightens or darkens the picture. Colour Increases or decreases colour intensity. Hue Increases or decreases the green tones. z “Hue” can only be adjusted for an NTSC colour signal (e.g., U.S.A. video tapes). Sharpness Sharpens or softens the picture. Colour Tone Adjusts the whiteness of the picture. “Cool”: Gives the white colours a blue tint. “Neutral”: Gives the white colours a neutral tint. “Warm”: Gives the wh...
Otros modelos de este manual:TV - KDL-26S4000 (5.96 mb)
TV - KDL-37S4000 (5.96 mb)
TV - KDL-32S4000 (5.96 mb)
TV - KDL-26U4000 (5.96 mb)